3.3 Navigational Aids
Introduction
Navigational aids are buoys, lighthouses or other marks placed on or by the sea to help seafarers. Their connection with this chapter is that they are usually marked on charts.
Navigational aids come in various shapes and sizes, and their purpose is to assist in safe navigation and pilotage. They can be very helpful to the skipper, but in order to use them safely it important to tie up what you see (buoy, light) with what is marked on the chart.
That way you are continuing this important cross-checking principle, because a buoy might be in the wrong position, or not charted, or showing the wrong light, or you might be making some kind of mistake in identifying it; any of these could lead to a dangerous wrong assumption unless you check for any discrepancy.
Also, the buoy's principle message might not be intended for you; it might be for a large ship. If you see Lateral Marks, for example, and use them to follow the channel, you might be following a large shipping channel, which may be precisely what you don't want to do. Sometimes you are safer, and out of larger ships' way, in slightly shallower water outside the main channel. The way to decide this is to look at the chart.
This section gives an overview of navigational aids and how they are charted, with reference to Chart 5011 for definitive and authoritative detail.
IALA Buoyage System
The International Association of Lighthouse Authorities has standardised the usage of navigational buoys world-wide, and these conventions are known as the IALA Buoyage System.
The following sections describe each of the standard types of mark (buoy or beacon) and how they are generally used, i.e. what they are intended to tell the skipper of a vessel.
Each type of mark has a particular colour, shape and top mark - smaller shapes at the top of the buoy (or beacon) - which further help to define the mark when you are looking at it. Some (but not all) are lit at night. The lights are of a colour and flashing pattern (called light characteristic - explained below) which also assist to identify the individual buoy, and its type.
A "buoy", by the way, is a floating object, anchored and chained in position, whereas a "beacon" is generally stuck into the sea-bed in shallow water, or placed on land.
Lateral Marks
Lateral marks are generally used to indicate the side of a channel of safe water for vessels, very often for entering a harbour, or for safe passage close to the land. There are two types, indicating opposite sides of the channel: Port-hand Lateral Marks and Starboard-hand lateral marks.
There are actually two further marks in the same class, called Preferred Channel Marks, which tell you that you can go either side but one side is the "preferred" channel. These are rare, but are included here for completeness.
Unfortunately, the IALA haven't quite managed to achieve a world-wide standard for lateral marks. This might sound like a fairly catastrophic failure, but it's not as bad as it sounds. There are two fairly distinct "regions", called Region A and Region B. Region B is the Americas, plus an area from the Philippeans to South Korea. Region A is everywhere else, i.e. Europe, Mediterranean, Africa, Indian Ocean, Australia. In practice, any chart will tell you which region it is in, and if you examine the chart for the way the marks are used, it will be obvious. The Lateral marks are different (actually, opposite colours) in the two regions.
In this section we're going to explain the marks for Region A to begin with, and then tell you briefly what the differences are for Region B.
Region A (Everywhere except Americas & Far East)
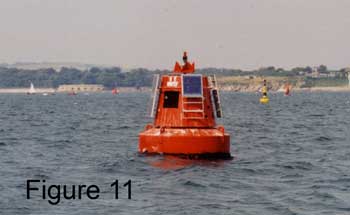
Port-hand lateral marks look like this. Note the colour: red; the shape:can-shaped, flat top. Some of them have a square or cylindrical top mark (this one doesn't, the thing at the top is a light attached to a radar reflector).
If lit, these marks show a red light, with characteristics stated on the chart (see section below on light characteristics).
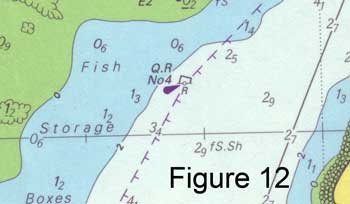
They are charted like this. The little circle at the bottom is the actual position of the buoy. Q.R describes the light characteristics (see below) and the magenta flash shows that it is lit. No 4 is the name of the buoy, which may be written on it.
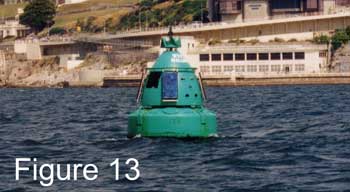
Starboard-hand lateral marks look like this. Colour is green; shape conical, pointed top; top mark (if any) triangular or conical.
If lit, these marks show a green light, with characteristics stated on the chart (see section below on light characteristics).
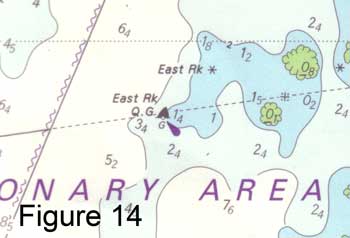
They are charted like this. This one is lit, with a quick flashing green light, and is called East Rock.
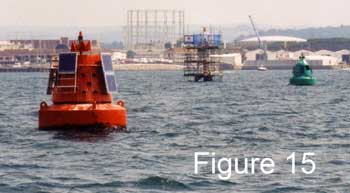 Lateral marks are generally used for well defined channels (or the important edge of a "channel" which may be pretty open on the other side), and the convention is that if you are going in the direction of the flooding tide (which includes going into harbour) you keep the Port-hand Lateral Marks to your port side, and the Starboard-hand Lateral Marks to your starboard side, in order to stay in the channel. Proceeding out of harbour you do the opposite. In the example in Figure 15, the channel into port is from the right of the picture to the left, between the two buoys.
Sometimes the general direction of buoyage (i.e. the direction of the flooding tide) is marked on the chart like this, but usually it's obvious when you look at the chart.

Finally the two rare ones. If you see what looks like a Port-hand Lateral Mark (red) but with a green stripe through it, there is a channel to either side of it, but for the "preferred" channel treat it as a Port-hand Lateral mark. Similarly a green mark with a red stripe through it should be treated as a Starboard-hand Lateral Mark for the preferred channel, but you may be able to go either side of it. These are, of course, charted, and are illustrated in 5011 Symbols and Abbreviations - see figure 17. As shown in 5011, these marks are given a specific light characteristic if lit. 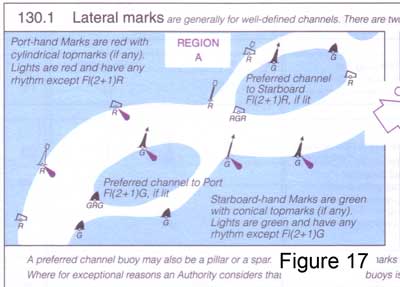
Region B (Americas, and Philippines to South Korea)
In Region B the shapes and top marks are the same as Region A for Port-hand and Starboard-hand, but the colours are reversed.
Red (conical) buoys are therefore kept to the starboard side when following a channel into harbour, and they have a saying which helps them to remember this: "red right returning" (learn it in an American Accent!).
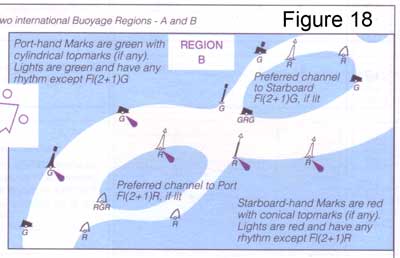
Similarly Green (can-shaped) buoys are kept to port in those circumstances.
The rarer preferred channel markers work as you would expect, with a green stripe through a red Starboard-hand Mark and a red stripe through the green Port-hand marker.
Just remember: the colours are reversed, everything else is the same. Figure 18 shows what 5011 has to say on the matter.
Cardinal Marks
The second "family" of IALA marks are the four Cardinal Marks, named North Cardinal, South Cardinal, East Cardinal and West Cardinal after the four cardinal points of the compass.
These marks are used more generally to indicate shallow water, or a danger, rather than the side of a channel. In each case, clear water is on the side of the buoy indicated by its name. Thus for an East Cardinal, clear water is to the east of it; and so on for each of the Marks.
But again, beware of this simple rule: you need to look at the chart to work out what the mark is trying to tell you, and who its message is intended for. If you "assume" (always a bad word) that you should pass to the east of an East Cardinal Mark when you see it ahead of you, you might run onto the very danger it is trying to warn you about. Or you might just be wasting your time, because the "danger" is for larger craft.
With that health warning, they are extremely useful and easy to identify, so it is well worth learning them.
North Cardinal Mark: 
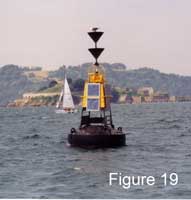
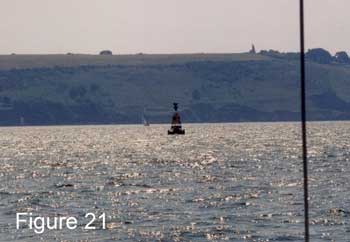
South Cardinal Mark: (see figure 19)
East Cardinal Mark:
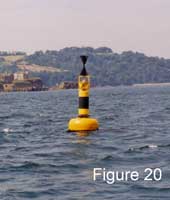
West Cardinal Mark: (see figure 20) 
To help remember these, most people invent some sort of rule or pattern, and here are mine (no better than anyone else's). They're all yellow and black, so you can say with total authority that is is a cardinal mark before you work out which one it is. Look at the top-marks: most people find 2 cones (triangles) pointing up easy to remember as North, and 2 pointing down pretty obvious as South. The East topmarks resemble an Egg (just) and the West a W on its side, or Wineglass.
 As to the colours, their positioning follows the same logic as the topmarks: just remember that the cones point towards the Black. So with North the black is at the top, South it's at the bottom. With East it's top and bottom and with West it's in the middle.
Just a word of warning - it's not so easy to make out the colours with "real" buoys as it is with illustrations in the book, because of the extra bits of buoy (solar cells etc), the way they are constructed, and paint rusting off. Look at the topmarks if you can, they may be easier to see. Figure 21 shows a cardinal buoy in difficult light - hard to see the colours, but relatively easy to see the topmarks of a south cardinal.
 As expected, these buoys are all marked on the chart in a logical manner, with the topmarks providing the easiest way of distinguishing between them. Here is the relevant entry in 5011 Symbols and abbreviations. B and Y are the colours Black and Yellow, and the colours are read from the top.
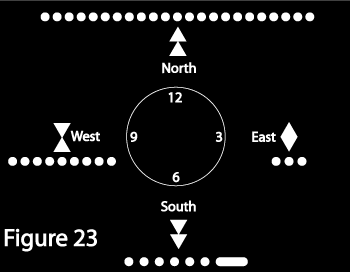 If lit, these marks have particular light characteristics which are fairly easy to remember (and are also marked on the chart). Just think of a clock face with the marks placed around it (see figure 23). East is at 3, South at 6, West at 9 and North at 12. The east cardinal flashes 3 times; the south 6 plus a long flash; the west flashes 9 times and the north flashes continuously. All the lights are white.
Safe Water and Isolated Danger Marks
Less widely used (certainly in the UK) than the Lateral and Cardinal Marks, these two indicate:
Safe Water - e.g. some distance off the entrance to a safe channel, to assist in locating it, and an isolated danger, such as a shallow rock or wreck.
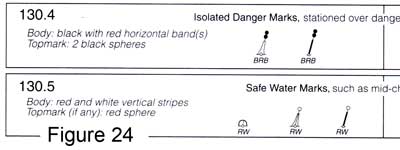
 The Safe Water Mark is red and white, in vertical stripes, with a single red sphere as a top mark (if there is one). Safe water is all around (in fact the only hazard is the buoy itself!), and once again it can be identified on the chart.
If lit, it is white, either isophase, occulting or a long flash (see below for explanations of these terms).
![]() The Isolated Danger Mark is stationed over a danger, and there is navigable water all around it (but not close to it). It is black and red, in horizontal bands, and the top mark is two black spheres. The chart will show you details of the danger, such as how shallow and extensive it is.
The Isolated Danger Mark is stationed over a danger, and there is navigable water all around it (but not close to it). It is black and red, in horizontal bands, and the top mark is two black spheres. The chart will show you details of the danger, such as how shallow and extensive it is.
If lit, it is a white light flashing in groups of two flashes - Fl(2). See below.
 As expected they are marked on the chart, with an indication of the top marks and colours. Figure 23 shows how 5011 describes this.
Special Marks
There are other buoys that have a right to be out there, but aren't placed there for the purposes of navigation. They are there for a different reason. The reason isn't always important, but the buoy is there, and most of them are marked on the chart, so they can be helpful to us for fixing or confirming our position.
They are called Special Marks, and they are yellow, can be any shape, and may have a topmark which is a yellow cross.
If lit, they flash a yellow light.
Light Characteristics
Some, but not all, buoys and beacons are lit at night.
In addition, other objects are lit. These may be lights which are arranged as navigational aids (described below), or objects which may be in the way of shipping at night, and need to be seen to be avoided.
In whichever category, objects which are lit at night are a) usually given a distinctive flashing pattern and colour(s), and b) marked on the chart with a description of their light characteristics. This section introduces how the light characteristics are described. Once again, the full definition of the way they are all described is contained in Chart 5011 Symbols and Abbreviations.
The fullest description of a light characteristic will be something like this:
Fl(3) R 10s 13m 5M
That would be for a lighthouse, and for a buoy you might just have: Fl(3) R 10s or even shorter: Fl R.
We'll look at each part of this in turn, tell you what it means, and outline what other possibilities there are in each element.
Fl(3)
That means flashing, in a group of three flashes - followed by a pause, then another 3 flashes. "Flashing" implies quite a slow rate of flash (rate of less than 50 per minute). Instead of Fl, you could have: Q (quick flashing) VQ (very quick flashing) or UQ (ultra quick), or LFl which is a long flash (2s or more). If there is no number in brackets, the flashing is continuous.
Note that Q, VQ etc have precise definitions in terms of the number of flashes per minute, and these are given in 5011.
Besides "flash" (which means the duration of light is shorter than the duration of darkness) lights can do other things. F means fixed (i.e. continuously on); Oc means occulting, so that the light is mainly on and goes off for short periods; and Iso, for isophase, which means on and off for equal times. If it is occulting, that may be a group of "off flashes" e.g. Oc(2), but that wouldn't make sense with F or Iso.
Occasionally you see something like (2+1) which means that the flashing pattern is two followed by another one after a short pause.
The other thing you might see here would be IQ or IVQ or IUQ. This means quick (or very quick or ultra quick) flashing, interrupted for a period of time, before resuming. Personally I find these very confusing, because your natural inclination is to count the flashes, and it isn't always the same number between interruptions!
R
Red. Other colours are W (white), G (green), Y (yellow, orange or amber), Bu (blue) and Vi (violet) - these last two are unusual. If no colour is stated, it's white.
If there are two (or more) colours mentioned, it may be a sectored light or direction light (see below).
10s
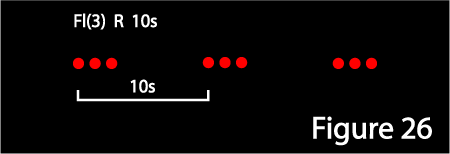 This is the period of the repeating pattern. This is a period in the mathematical sense, i.e. the length of time it takes for the whole pattern to repeat itself. In this example (Fl(3) ... 10s) it is the time from when the three flashes start, till when the flashing starts again. It is NOT the duration of the pause between the flashing.
If there is no repeating pattern of flashes or occulting, it is omitted: hence Q R for example, where the quick flashing is continuous.
13m
This is the height of the light above sea level in metres, which enables you to judge how far away it can be seen from, over the horizon. (Like all heights it is referred to the height datum of the chart, which is normally MHWS and is stated on the chart.)
Note that this isn't necessarily the height of the lighthouse - the light could be on a small structure placed on top of a cliff or hill.
If this is omitted (usual for buoys) the light is close to sea level.
5M
This is the luminous range, nominal visible range of the light, in nautical miles, in good visibility. I.e. it is related to how bright the light is. Note that with lighthouses, the range at which you see the light is generally determined by its (and your) height and NOT by this number. It is generally omitted for buoys, which aren't intended to be seen many miles away.
Lighthouses, Shore Lights and Floating Lights
The IALA buoys are not the only navigational aids that may be lit at night. There is an array of different night-time navigational aids, mostly on-shore but some which are floating.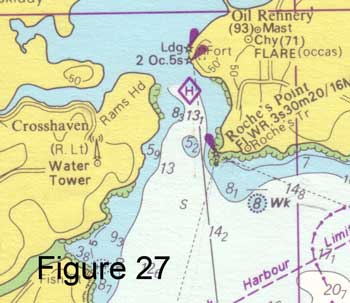
Figure 27 show how lighthouses and other shore lights are charted. They are represented by a black star, with a magenta flash to say they are lit - and of course the light characteristics are written beside them. In this example you can see the major lighthouse at Roche's Point (lights 30m high) and two leading lights further into Cork harbour. Interestingly there are also two other examples of things you might see at night that aren't navigational aids as such: a radio mast on the west side of the entrance with (R. Lt) beside it, which tells you that there is a red air obstruction light on it (for warning aircraft); and FLARE (occas) at the oil refinery on the East side.
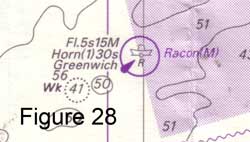
Figure 28 shows an example of a ligh vessel (which will be familiar to listeners to the shipping forecast on Radio 4). There are a few similar symbols (see 5011).
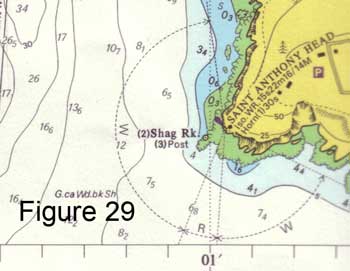 Something which is quite common in lights provided to guide vessels into harbour is the sectored light, which shows as a different colour in different directions. These can be arranged to that, for example, the light you see when you are in the safe channel is white and the light you see when you are approaching a danger is red. Figure 29 shows an example of such a light, where the light characteristic mention the two colours W and R, and the chart shows the sectors in which those colours are visible.
Direction lights can be used to guide vessels up channels. They are sometimes sectored lights, with a central white sector seen when you are in the channel, flanked by red and green to show whether you are on one or other side of the channel. Alternatively they can shine only in a particular direction, with reduced or no light seen if you are either side of a particular bearing from the light. Chart 5011 Symbols and Abbreviations shows examples of this.
Sounds
Both buoys and lights may be designed to make a sound so that you can get some idea of what direction they are in, in fog. Buoys - especially remote buoys along the coast - can have a bell or a kind of mournful hooter, both of which are activated by the motion of the buoy in the sea. Lighthouses can have a wider range of sounds and can be louder. In both cases the sound is described on the chart, according to the abbreviations in Chart 5011.
It's probably true to say that with the advent of cheap portable GPS navigators, the sort of navigation that relied on these sounds in fog is becoming more rare.
Other Navigational and Pilotage Aids: Daymarks; transit marks; channel marks
There are a variety of other types of mark used to guide you into harbours etc. These are outside the scope of the IALA buoyage system, and indeed may or may not be marked on charts, although the chances are that the established ones will be. Certainly pilot books / cruising guides will give you plenty of information about them, and how to use them when piloting into/out of a harbour or anchorage.
Certain parts of the coast tend to have their own ideas on these: here in the south west of England there are a quite a few unlit Daymarks - substantial structures built high up on the cliffs, sometimes painted in conspicuous colours, and marked on the charts. They are there purely to assist navigation, usually to help craft to find a particular harbour.
On other parts of the coast white marks may be painted on rocks, or cairns built, or sticks and branches ("whithies") stuck into the mud to show the edge of a channel. The variety is as wide as human ingenuity, and the methods are adapted to local conditions.
Everywhere, natural features or buildings unconnected with navigation are used as guides, and very often marked on charts as well as cruising guide plans.
Transit Marks
A particular favourite for leading craft into a harbour is transit marks. These have the advantage that, when you keep them lined up, they keep you on a defined straight line, even though you may have started your approach from any direction and you may have to cope with strong wind or tide.
For main harbours, they are often markers which are deliberately constructed in the correct place, painted in bright colours, charted, sometimes lit, and maintained by the harbour authority. For minor anchorages they may be natural features, which are described in the pilot books.
There is one convention to be aware of. Transit marks are always arranged so that the one nearest to you is lower than the further mark. This means that you can always work out which way to go to get them in line. Say the bottom one is to the left of the top one, turn left to get them back in line. (Sometimes it helps if you imagine a line which starts at the higher back marker, goes through the lower front marker, and then out towards you - your job is to stay on that line.)